


Guide To Vendor Payment & Credits
The Vendor Payments section in the system helps you manage and track payments made to vendors.
Adding a Vendor Payment
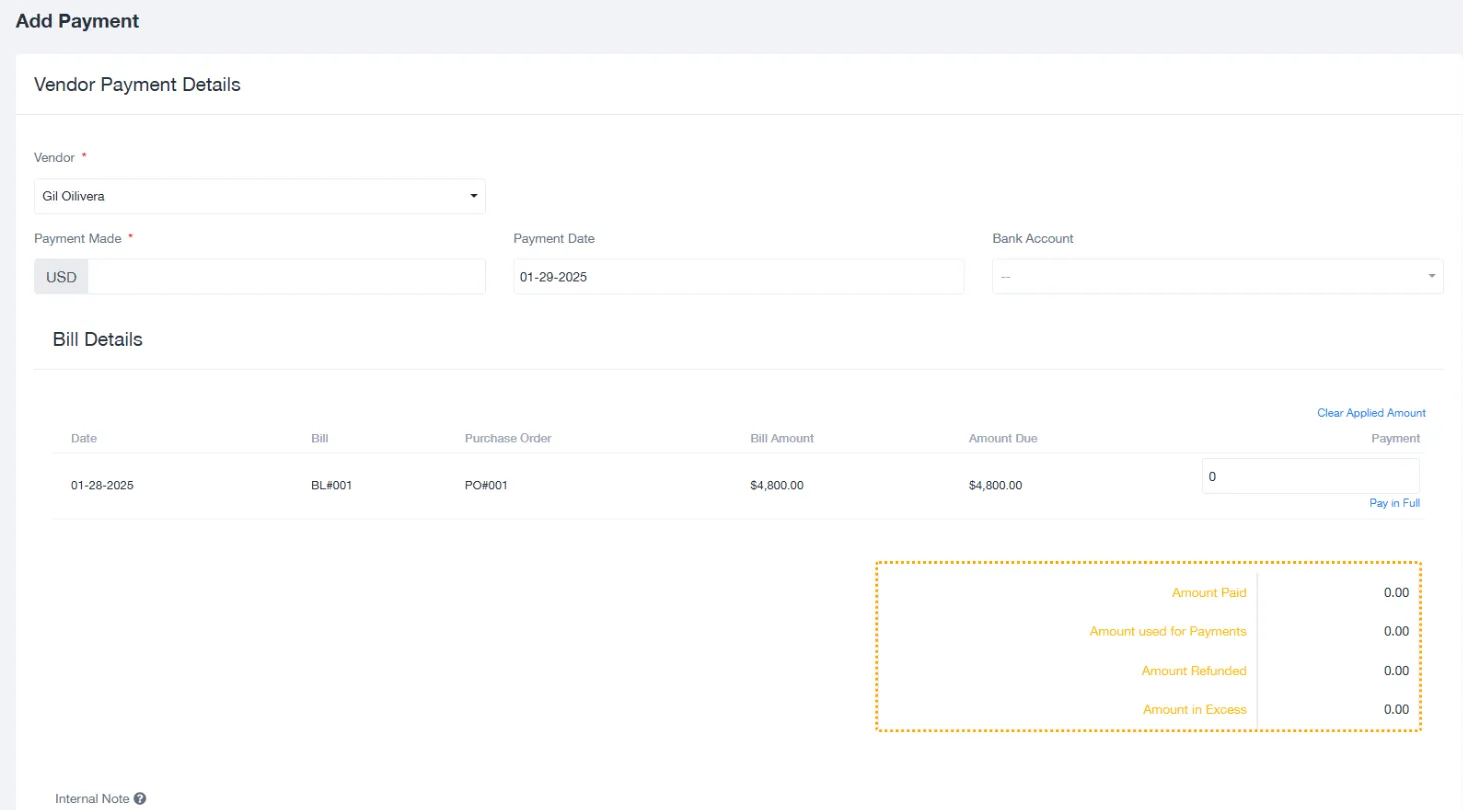
- Navigate to Vendor Payments:
- Access this section by selecting the “Vendor Payments” option from the main menu.
- Click on ‘Add Vendor Payment’:
- A new page opens up to input payment details.
- Fill in Payment Details:
- Vendor: Choose the vendor you are paying from the dropdown.
- Payment Made: Enter the payment amount (currency field available).
- Payment Date: Select the date of payment using the calendar picker.
- Bank Account: Optionally select the bank account used for the payment.
- Internal Notes: Add any remarks about the payment if needed.
- Select Bills to Pay:
- The section below lists open bills for the selected vendor.
- Assign payment amounts to corresponding bills. You can pay in full or partial amounts.
- If overpayment occurs, the system records it under Amount in Excess.
- Save the Payment:
- Click Save to finalize the payment. The system updates the bill status automatically.
Vendor Credits
The Vendor Credits section lets you manage credit notes issued by vendors.
How Excess Payments Are Handled
When a payment in excess is made to a vendor, the system automatically records the overpayment as a Vendor Credit. This ensures that the excess amount is not lost and can be utilized for future transactions with the same vendor.
Process Overview
- Excess Payment Identification:
- During the Vendor Payment process, if the total payment exceeds the bill amount(s), the surplus is categorized as an Amount in Excess.
- The system flags this as a credit owed to you by the vendor.
- Automatic Credit Creation:
- The surplus amount is stored under the Vendor Credits section, linked to the specific vendor.
- A new credit record is created, detailing the credit amount, vendor information, and date of creation.
- Applying the Vendor Credit:
- Vendor credits can be applied to future bills or purchase orders.
- During payment for a new bill, the system will allow you to utilize existing credits to reduce the total amount due.
Key Features of Vendor Credits for Excess Payments
- Transparency:
- All credits, including those generated by overpayments, are logged with clear details such as:
- Vendor Name
- Associated Bill or Purchase Order (if applicable)
- Credit Amount and Date
- Status (e.g., Open or Applied)
- All credits, including those generated by overpayments, are logged with clear details such as:
- Ease of Application:
- When creating a new vendor payment, the system automatically suggests available credits for the selected vendor.
- You can either partially or fully apply the credit to the current payment.
- Audit Trail:
- Each credit retains a history of how it was created and applied, ensuring a robust audit trail for financial records.
Best Practices
- Reconcile Payments Regularly:
Ensure that all vendor payments match the recorded bills to avoid discrepancies. - Track Excess Payments:
If excess payments are recorded, allocate them to future bills or request vendor refunds. - Maintain Clear Notes:
Use the internal notes section to track details about disputes, partial payments, or credit usage.