


Creating and Managing Deals
1. Deals Screen Overview
Key Features

- Add Deal Button:
- Click the green + Add Deal button to create a new deal.
- Opens a detailed form for inputting deal information.
- Import/Export Buttons:
- Import: Upload external deal data in a supported format (e.g., CSV).
- Export: Download deal data for external analysis or sharing.
- Deals Table:
- Displays a list of existing deals with sortable columns, including:
-
- Deal Name
- Lead Name
- Contact Details
- Value
- Close Date
- Next Follow-Up
- Deal Agent
- Deal Watcher
- Stage
-
- Displays a list of existing deals with sortable columns, including:
2. Adding a New Deal
Click the + Add Deal button to open the “Add Deal Info” form. This form includes the following fields:
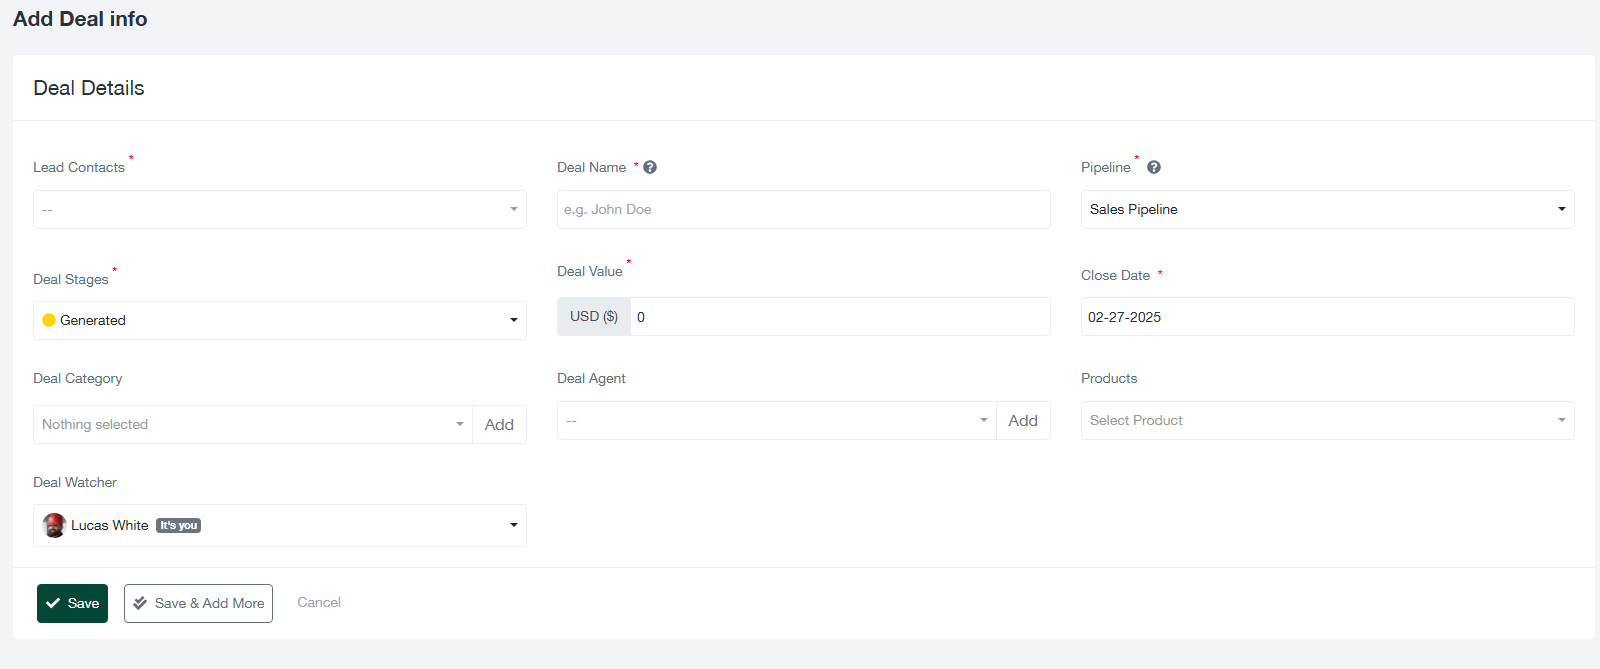
Deal Details Form
- Mandatory Fields (marked with *):
- Lead Contacts: Select the lead associated with the deal.
- Deal Name: Provide a name for the deal.
- Pipeline: Choose a sales pipeline (e.g., Sales Pipeline).
- Deal Stages: Specify the current stage of the deal (e.g., Generated).
- Deal Value: Enter the estimated value of the deal.
- Close Date: Set the expected closure date.
- Optional Fields:
- Deal Category: Categorize the deal for better tracking.
- Deal Agent: Assign a specific agent responsible for the deal.
- Deal Watcher: Specify users who should monitor deal progress.
- Products: Select products associated with the deal.
- Actions:
- Save: Save the deal and return to the Deals screen.
- Save & Add More: Save the current deal and open a new form for adding another deal.
- Cancel: Exit the form without saving.
3. Managing Existing Deals
Sorting and Filtering
Click on column headers to sort data by Deal Name, Value, Close Date, etc. Use search and filters to narrow down results.
Bulk Actions
Select multiple deals using the checkboxes in the table. Perform bulk actions such as exporting selected deals.
Editing Deals
Use the “Action” column in the table to view or edit individual deal details.
4. Importing and Exporting Deals
Importing Deals
- Click the Import button.
- Select a file in the supported format (e.g., CSV).
- Map the uploaded file’s columns to the system’s fields.
- Confirm the import to add deals to the system.
Exporting Deals
- Click the Export button.
- Choose the desired format for the export (e.g., CSV, Excel).
- Download the exported file to your system.
5. Tips for Effective Deal Management
- Ensure all mandatory fields are completed when adding deals to avoid validation errors.
- Use the Pipeline and Deal Stages fields to track deals through their lifecycle.
- Regularly export deals for backup and analysis purposes.
- Keep the Close Date field updated to prioritize deals nearing completion.