


Getting Started with Workcase
This Guide provides a step-by-step framework to help users navigate and utilize the Workcase software efficiently. This guide covers essential workflows, including employee and client management, project setup, task assignment, time tracking, invoicing, payment tracking, asset management, inventory control, and field service operations. Each section is designed to familiarize users with core functionalities, ensuring seamless collaboration, optimized resource allocation, and streamlined financial tracking. Whether you are setting up your organization, managing daily operations, or overseeing project execution, this guide equips you with the knowledge to maximize productivity and maintain operational efficiency.
Add Employees
Adding employees to your system is a fundamental step in managing your organization’s workflow efficiently. With the employee management feature, you can create individual profiles for each team member, granting them access to the system and allowing you to assign tasks, track time, and collaborate effectively. This section outlines the process of adding employees and managing their profiles.
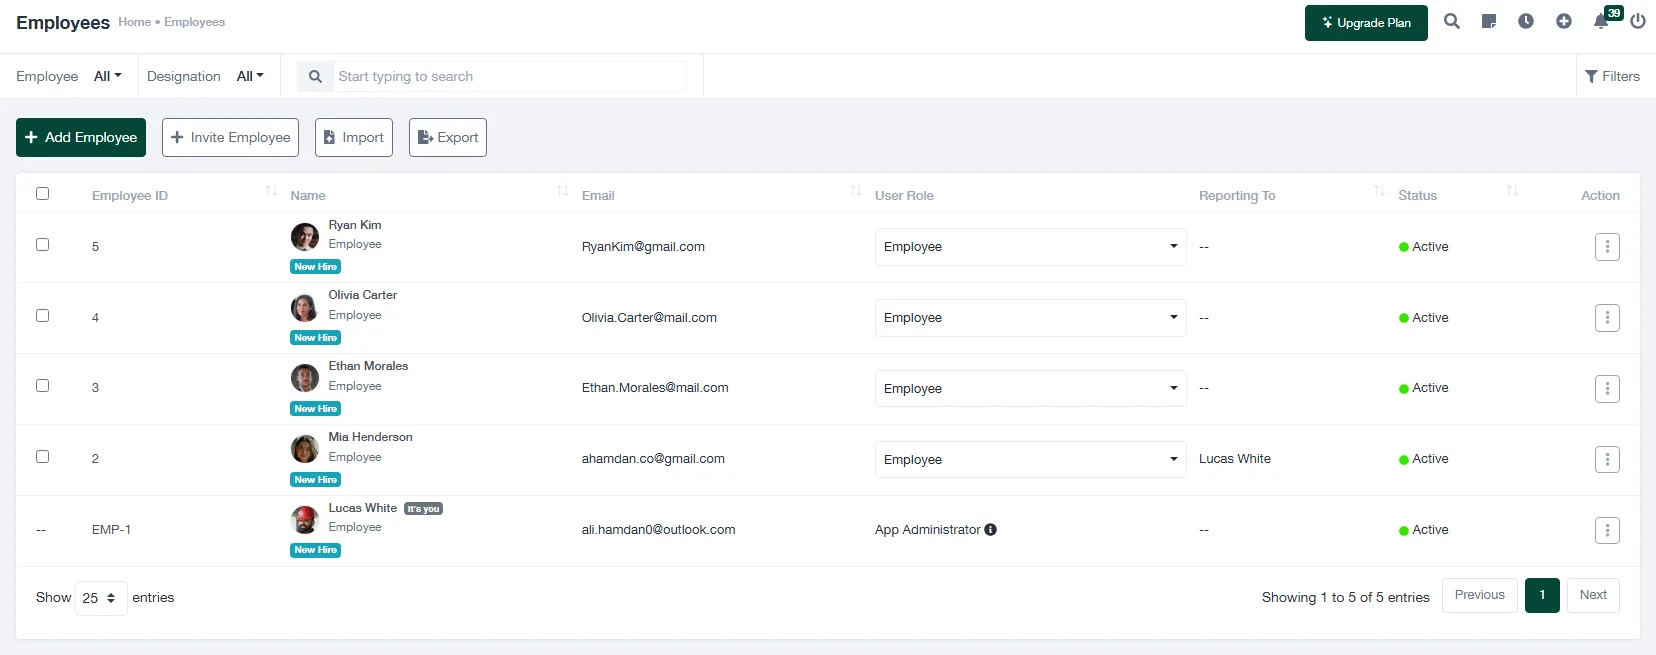
Steps to Add Employees
- Navigate to the Employee Management Module: Access the “Employees” tab from the main menu to view and manage your organization’s workforce.
- Click on “Add Employee”: This button will direct you to a form where you can input employee details.
- Fill in the Required Fields: Provide the following details:
- First and Last Name: The employee’s full name for identification purposes.
- Email Address: Used for login and communication purposes.
- Phone Number: Optional but helpful for contact information.
- Job Role: Assign a job role to categorize the employee’s responsibilities.
- Assign Permissions: Specify the employee’s role-based permissions to control their access to specific modules and actions within the system.
- Save the Employee Profile: Once all required details are entered, click “Save” to add the employee to the system.
Managing Employee Profiles
After creating an employee profile, you can update their information, deactivate accounts for former employees, or adjust role-based permissions as necessary. This ensures that only active team members have access to the system, maintaining data security and operational efficiency.
For more details, visit the Employee Management Guide.
Add Clients
Adding clients to your system is an essential step to manage your customer relationships and streamline your project workflows. By creating detailed client profiles, you can easily track their information, monitor ongoing projects, and maintain a history of interactions. This section guides you through the process of adding and managing clients effectively.
Steps to Add a Client
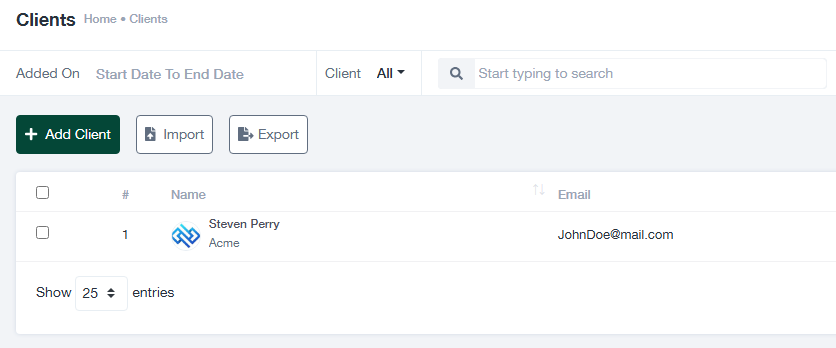
- Navigate to the Client Management Module: Go to the “Clients” tab from the main menu to access the client management section.
- Click on “Add Client”: This button opens a form where you can input the client’s information.
- Fill in Client Details: Provide the following information:
- Name: Enter the full name of the client or organization.
- Email Address: This is used for communication and sharing invoices or updates.
- Phone Number: Optional but recommended for direct contact.
- Company Name: If the client represents a business, include their company name.
- Address: Add the client’s physical address for billing or shipping purposes.
- Assign to Relevant Projects: Link the client to existing projects if applicable.
- Save the Client Profile: Once all fields are completed, click “Save” to finalize the client profile.
Managing Client Profiles
After adding a client, you can update their details, deactivate inactive profiles, or view their project and financial history. This feature ensures that all client information is organized and accessible when needed.
For detailed instructions, visit the Client Management Guide.
Create Projects
Setting up projects in your system is the cornerstone of effective project management. A well-defined project allows you to organize tasks, allocate resources, monitor progress, and ensure timely delivery. This section walks you through creating and managing projects efficiently.
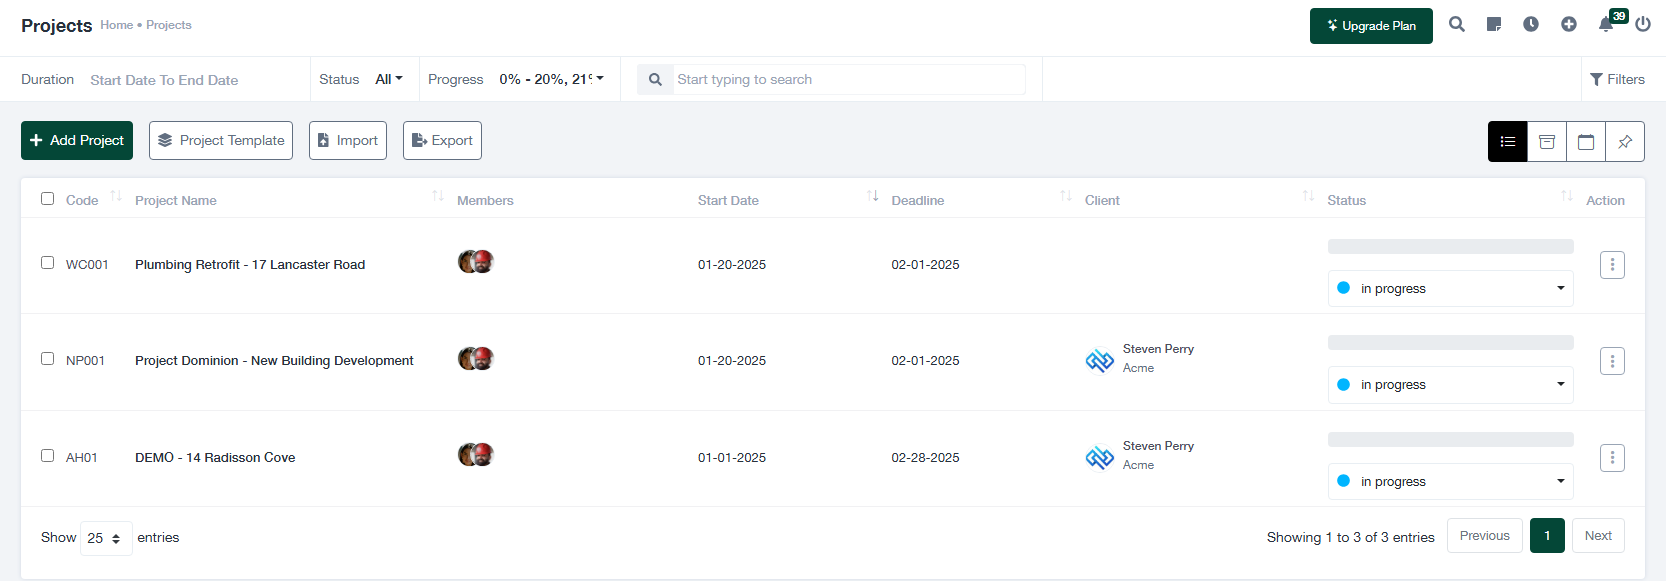
Steps to Create a Project
- Access the Projects Module: Navigate to the “Projects” tab from the main menu to open the project management section.
- Click on “Add Project”: Select the option to create a new project. This action will prompt you to fill in a form with project details.
- Fill in Project Details: Provide the following key information:
- Project Name: Enter a descriptive title that clearly defines the scope.
- Client: Assign the project to a specific client from your database.
- Start and End Dates: Define the project timeline for better planning and tracking.
- Budget: If applicable, set a financial limit for the project.
- Description: Add a detailed description of the project’s goals, objectives, and deliverables.
- Select Project Type: Choose the appropriate project category, such as time-based or fixed price.
- Save the Project: Once all the details are filled in, click “Save” to create the project.
Managing Projects
After creating a project, you can customize it further by adding members, tasks, milestones, and files. Utilize the dashboard to monitor project progress, view team performance, and address potential bottlenecks.
For a detailed walkthrough, visit the Project Management Guide.
Add Members to a Project
Adding the right team members to a project ensures that tasks are executed efficiently and goals are achieved within the specified timeline. Members can be assigned specific roles and responsibilities, enabling better collaboration and accountability. This section explains how to add members to a project and manage their roles effectively.
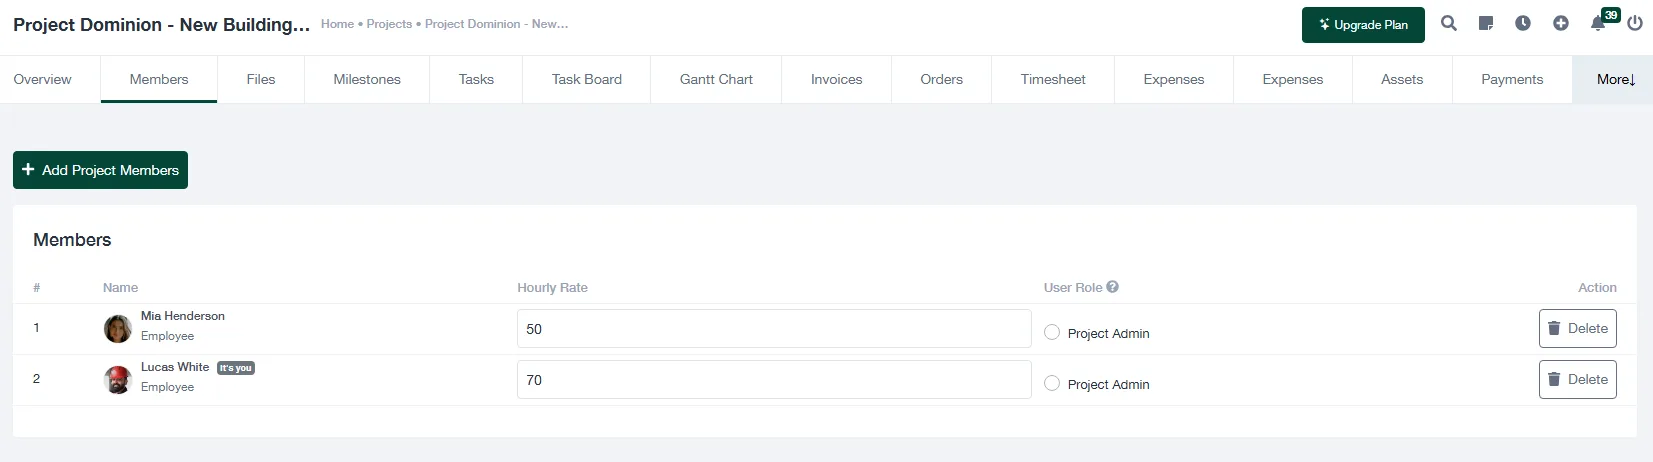
Steps to Add Members
- Access the Project: Navigate to the “Projects” tab and open the specific project where you want to add members.
- Go to the Members Section: Click on the “Members” tab within the project dashboard to view or modify the team assigned to the project.
- Add Members: Select “Add Member” to assign team members to the project. You can:
- Choose team members from the existing employee database.
- Specify their role in the project (e.g., manager, contributor, reviewer).
- Assign Permissions: Based on the member’s role, assign appropriate permissions, such as task assignment, file access, or milestone updates.
- Save Changes: Once all members are added and their roles are assigned, click “Save” to update the project team.
Collaboration Features
Team members assigned to a project can collaborate using features such as shared task boards, file uploads, and milestone tracking. Clear role definitions and permissions reduce confusion and foster seamless communication.
For more detailed guidance, visit the Project Details Guide.
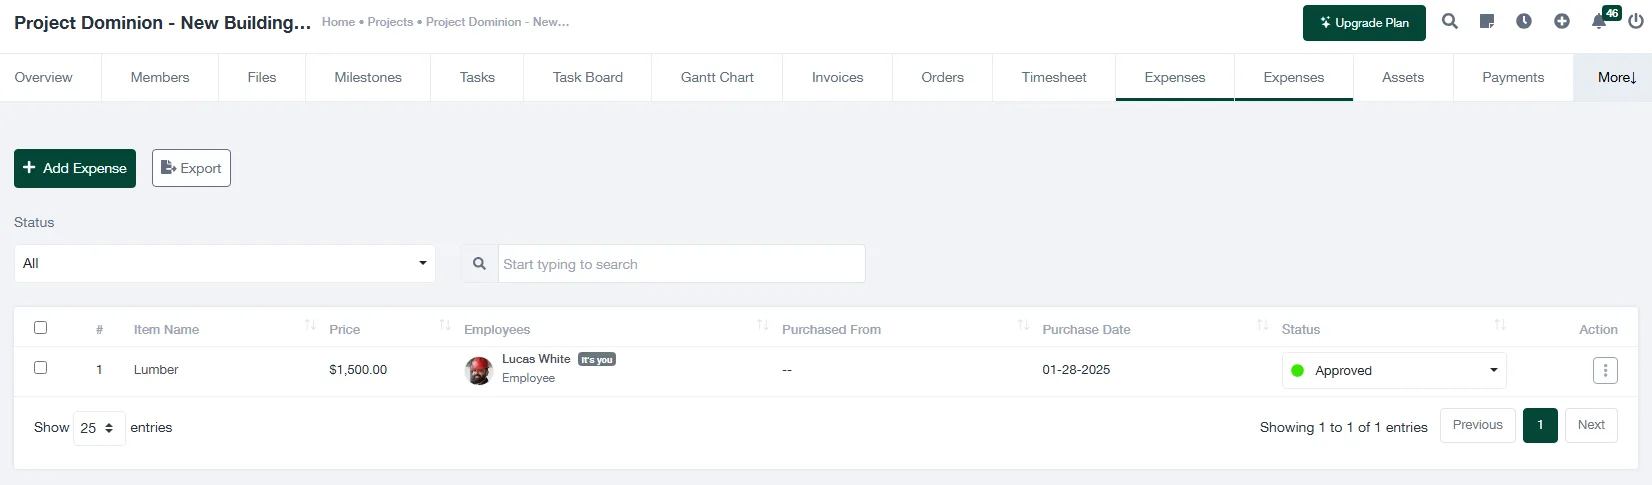
Create Tasks

Efficient task management is critical for successful project execution. By creating tasks and marking them as billable, you ensure that the time spent on specific activities is accurately tracked and invoiced to clients. This section provides a step-by-step guide on how to create tasks and set them as billable within a project.
Steps to Create Billable Tasks
- Access the Project: Navigate to the “Projects” section and open the project where you want to create tasks.
- Open the Task Tab: Click on the “Tasks” tab within the project dashboard to view or manage tasks.
- Add a New Task: Select “Add Task” and fill in the required details:
- Task Title: Provide a clear and concise title for the task.
- Description: Add any relevant details or instructions about the task.
- Due Date: Specify the deadline for task completion.
- Mark as Billable: Enable the “Billable” option for the task to indicate that the time logged against it will be invoiced. You can also set the hourly rate for billing.
- Assign to Team Members: Select one or more employees responsible for completing the task.
- Save the Task: Once all details are added, click “Save” to include the task in the project.
Tracking Billable Time
Once a task is marked as billable, team members can log their time spent on the task using the timesheet feature. The logged hours will automatically be associated with the task and included in project invoices.
Benefits of Billable Tasks
- Ensures accurate client billing.
- Provides transparency on the time spent on specific activities.
- Streamlines the invoicing process.
For more detailed information, refer to the Task Management Guide.
Assign Tasks to Employees
Steps to Assign Tasks to Employees
- Access the Task Tab: Navigate to the “Tasks” tab within the project dashboard where the task was created.
- Select the Task: Identify the task you wish to assign and click on it to open the task details.
- Assign Employee(s): Look for the “Assign To” field and choose the employee(s) from the dropdown list. You can assign multiple team members if needed.
- Set Priority: Use the priority options (e.g., Low, Medium, High) to indicate the urgency of the task for the assigned team members.
- Add Additional Instructions (Optional): Include comments or instructions in the task details to clarify expectations for the employee.
- Save Changes: Once all details are updated, click “Save” or “Update” to confirm the assignment.
For more details on task assignment, refer to the Task Management Guide.
Manage Tasks on Kanban
Kanban boards provide a visual representation of tasks, making it easier to track progress, identify bottlenecks, and ensure timely completion. Managing tasks on a Kanban board allows you to organize and monitor work efficiently. Here’s how you can make the most out of the Kanban feature in your project management tool.
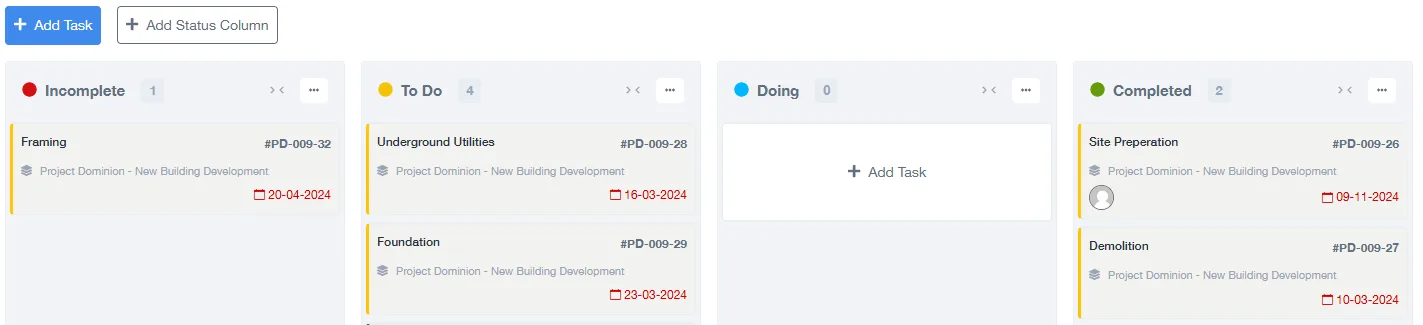
Steps to Manage Tasks on Kanban
- Access the Kanban Board: Navigate to the project dashboard and select the “Kanban Board” tab to view all tasks in a drag-and-drop interface.
- Understand Task Columns: The Kanban board is divided into columns representing task statuses, such as “To Do,” “In Progress,” “Review,” and “Completed.”
- Update Task Status: To change the status of a task, drag and drop the task card from one column to another. For instance, move a task from “To Do” to “In Progress” when work begins.
- Add New Tasks: Click on the “+” or “Add Task” button within the relevant column to create a new task directly from the Kanban board.
- Edit Task Details: Click on a task card to open its details. From there, you can update the assigned employee, add comments, change the due date, or adjust the priority.
- Filter and Search: Use the filter or search bar to view tasks assigned to specific team members or tasks with a particular priority.
Benefits of Kanban Boards
- Provides a clear overview of the project’s progress and task distribution.
- Facilitates real-time updates on task statuses.
- Promotes better collaboration and communication among team members.
Tips for Effective Task Management
- Regularly update task statuses to reflect the current state of the project.
- Use tags or labels to categorize tasks for easier identification.
- Monitor tasks in the “Review” column to quickly address any issues before moving them to “Completed.”
For more information, refer to the Kanban Board Guide.
Add and Manage Assets
Assets are a crucial component of any project, especially in industries like construction and field services. Managing your assets effectively ensures that resources are allocated appropriately, tracked accurately, and maintained efficiently. In your project management tool, you can add, update, and monitor assets with ease. Here’s how to manage this process effectively.
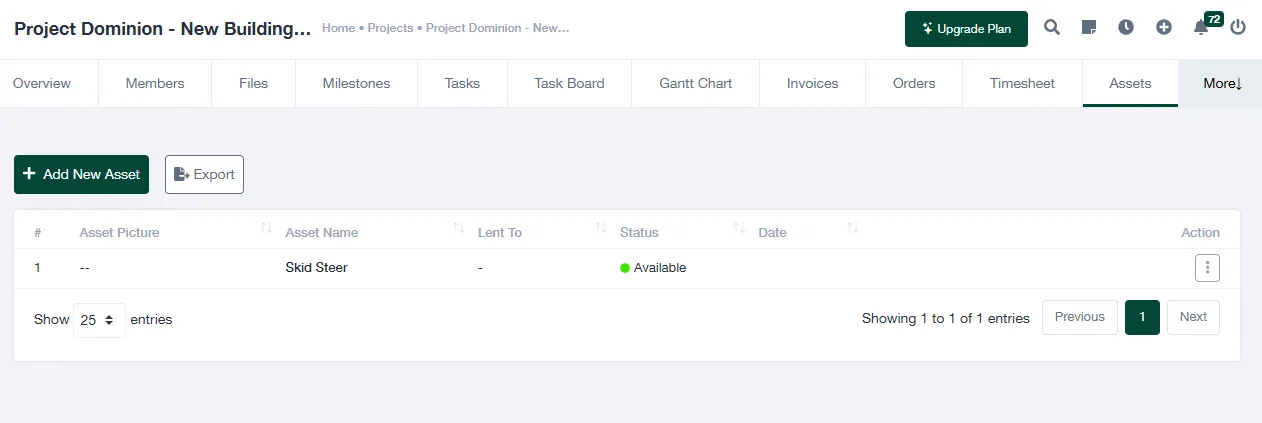
Steps to Add and Manage Assets
- Navigate to the Assets Module: From the project dashboard, go to the “Assets” tab to view the current list of project assets.
- Add a New Asset:
- Click on the “Add New Asset” button.
- Fill in the asset details, such as the name, type (e.g., equipment, tools), make, model, serial number, and location.
- Specify the asset’s status (e.g., Available, Non-Functional, Under Maintenance) and warranty end date.
- Choose whether to log hours for usage and assign the asset to a project.
- Click “Save” to add the asset to the system.
- Update Existing Assets: Click on an asset from the list to modify details like the status, location, or maintenance schedule.
- Monitor Asset Status: Use the status indicators to keep track of which assets are functional, need maintenance, or are out of service.
- Filter and Search: Use the filter and search tools to quickly locate specific assets based on criteria like name, type, or status.
Benefits of Asset Management
- Improved resource allocation by knowing the availability of assets.
- Reduced downtime with timely maintenance and status updates.
- Better cost management through detailed asset tracking and usage logs.
Best Practices for Asset Management
- Ensure all new assets are recorded in the system as soon as they are acquired.
- Regularly update the status and maintenance schedule for each asset.
- Monitor usage logs to prevent overuse or misuse of critical equipment.
For detailed instructions, visit the Asset Management Guide.
Track Time on Timesheets
Accurate time tracking is essential for ensuring accountability, improving productivity, and generating correct invoices. Timesheets allow you to track the time spent on various tasks, assign it to specific employees, and ensure that all hours are accounted for. Here’s how you can utilize timesheets effectively within your project management system.
Steps to Track Time on Timesheets
- Access the Timesheet Module: Navigate to the “Timesheet” section of the project dashboard to view time logs for all team members.
- Log Time:
- Click on the “Log Time” button.
- Select the employee for whom you are logging time.
- Assign the time entry to a specific task or project.
- Enter the number of hours worked for each day.
- Save the time entry by clicking on “Save”.
- Review Time Logs: Use the daily, weekly, or monthly view to review logged hours for individual team members or the entire project team.
- Filter by Employee or Task: Apply filters to view specific employees, tasks, or statuses (e.g., approved, pending, or invoiced).
- Approve Time Entries: Managers can review and approve time logs to ensure they are accurate before generating invoices.
Benefits of Using Timesheets
- Enhanced accountability by tracking time spent on tasks.
- Accurate invoicing by ensuring all billable hours are recorded.
- Improved productivity through detailed insights into time allocation.
Best Practices for Timesheet Management
- Encourage employees to log time daily to avoid missing entries.
- Regularly review and approve time entries to maintain accurate records.
- Use timesheet data to identify inefficiencies and optimize workflows.
For more detailed guidance, visit the Timesheet Management Guide.
Create Invoices from Time Logged
Generating invoices from logged time ensures that billable hours are accurately reflected in client billing. This feature helps streamline the invoicing process by automatically pulling approved timesheet entries into an invoice, reducing manual data entry and improving accuracy.
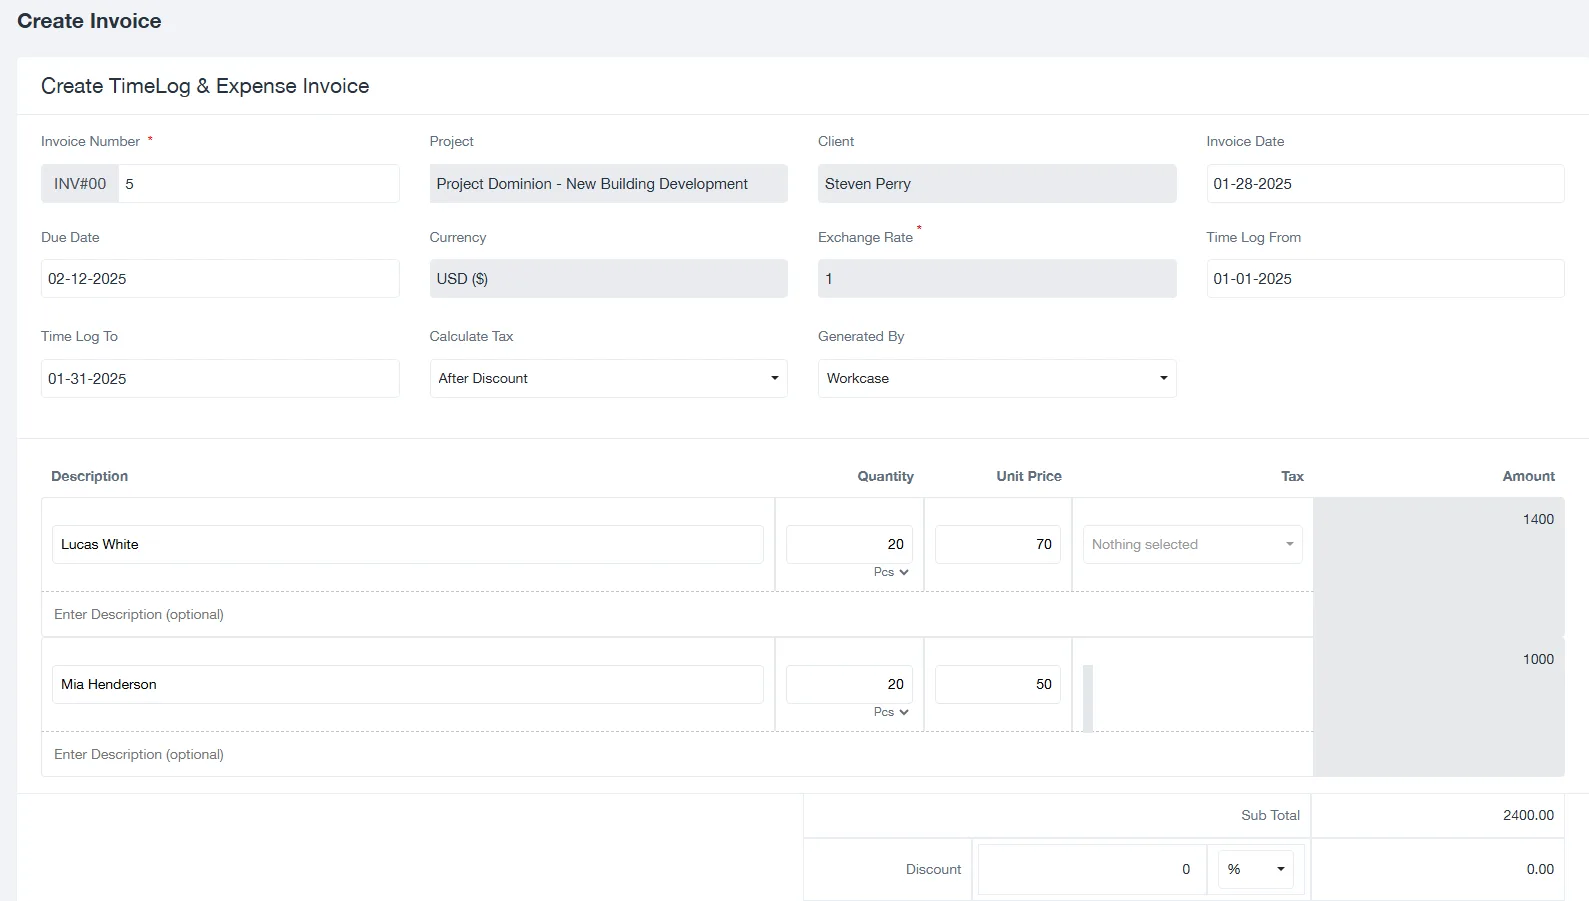
Steps to Create an Invoice from Logged Time
- Access the Invoices Module: Navigate to the “Invoices” section in the finance dashboard.
- Click on “Create Invoice”:
- Select “Create Time Log Invoice” to generate an invoice based on approved time logs.
- Alternatively, choose “Create Time Log & Expense Invoice” if additional expenses need to be included.
- Select the Project and Client:
- Choose the relevant project for which the invoice is being created.
- The system automatically pulls time logs associated with the project.
- Adjust Invoice Details:
- Invoice Number: Ensure a unique identifier is assigned.
- Invoice Date & Due Date: Specify the issue and payment deadline dates.
- Tax & Discounts: Apply tax rates and discounts as needed.
- Review and Finalize the Invoice:
- Verify that all logged hours are included with correct hourly rates.
- Adjust descriptions if necessary.
- Save or Send the Invoice:
- Click “Save” to generate the invoice.
- Use the “Send” option to email the invoice directly to the client.
- Export the invoice as a PDF for record-keeping.
Benefits of Invoicing from Time Logs
- Ensures accurate billing by directly pulling data from timesheets.
- Reduces administrative workload by automating invoice creation.
- Provides clients with a transparent breakdown of billable hours.
Best Practices for Invoice Management
- Regularly review and approve time logs to avoid discrepancies in invoices.
- Use invoice reminders to follow up on unpaid bills.
- Export and archive invoices for financial records and audits.
For more details, visit the Project Invoices Guide.
Track Payments
Tracking payments ensures that all incoming revenue is recorded, reconciled, and allocated to the correct invoices. With the payment tracking module, you can easily monitor which invoices have been paid, which are pending, and manage partial or full payments efficiently. This guide walks you through the process of tracking payments within the system.
Steps to Track Payments
- Access the Payments Module: Navigate to the “Payments” section under the Finance menu.
- View the Payments Dashboard:
- The dashboard provides an overview of total payments received, pending invoices, and overdue amounts.
- You can filter payments by date, client, or invoice status.
- Record a New Payment:
- Click on “Add Payment” to manually log a payment received.
- Select the relevant Client and Invoice to associate the payment with.
- Enter the Amount Paid and select the Payment Method (e.g., Bank Transfer, Credit Card, Cash).
- Specify the Transaction Date and add internal notes if needed.
- Click “Save” to finalize the payment entry.
- Track Payment Status:
- Use the payment list to track the status of each invoice.
- Invoices will automatically update their status to “Paid” once fully settled.
- For partial payments, the system will indicate the remaining balance due.
Managing Overdue Payments
- Use the overdue filter to identify unpaid invoices past their due date.
- Send automated or manual payment reminders to clients directly from the system.
- Negotiate payment plans for clients with outstanding balances and log partial payments accordingly.
Benefits of Payment Tracking
- Improves financial accuracy by keeping records up to date.
- Streamlines cash flow management by monitoring incoming payments.
- Helps prevent overdue invoices through proactive tracking and reminders.
Best Practices for Payment Management
- Regularly reconcile payments with bank statements for accuracy.
- Ensure all payments are correctly categorized by method and date.
- Utilize payment reports to analyze revenue trends and improve financial planning.
For more detailed instructions, visit the Payments Guide.
Manage Site Activity
Managing site activity efficiently is crucial for tracking field operations, resolving issues promptly, and ensuring that all tasks and reports are properly logged. The **Field Tickets** module enables teams to document, assign, and track site-related incidents, work orders, and service requests in real-time.
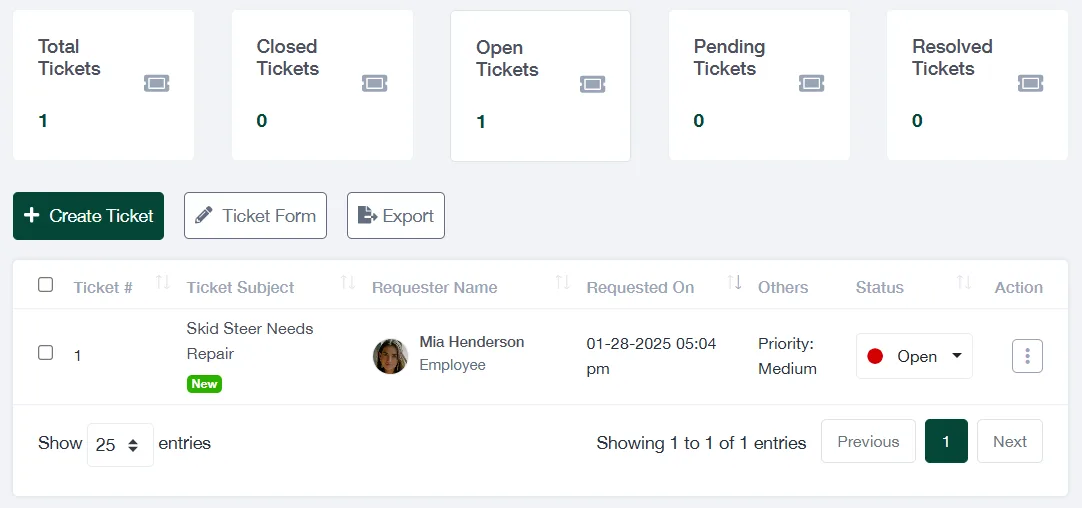
Steps to Manage Site Activity
- Access the Field Tickets Module:
- Navigate to the “Field Tickets” section from the main menu.
- The dashboard will display open, closed, and pending tickets.
- Create a New Field Ticket:
- Click “Create Ticket” to log a new site activity.
- Enter a detailed **Ticket Subject** to describe the issue or request.
- Select the Requester (Employee or Client) responsible for reporting the issue.
- Choose the **Project** and assign it to a specific **Department or Group** for resolution.
- Add a **Description** of the problem, attach supporting files, and set the priority level (Low, Medium, High).
- Click “Save” to submit the ticket.
- Update and Track Tickets:
- Monitor the ticket status: **Open, In Progress, Resolved, or Closed**.
- Reassign tickets to other team members when necessary.
- Add internal comments or updates to track progress.
- Mark tickets as **Closed** once the issue has been resolved.
- Search and Filter Tickets:
- Use filters to sort tickets by date, requester, project, or status.
- Quickly identify high-priority or overdue tickets.
- Export Ticket Reports:
- Click the **Export** button to download reports for record-keeping or auditing.
- Generate reports based on **open issues, resolved tickets, or department-specific activity**.
Benefits of Managing Site Activity
- Ensures real-time issue tracking and faster resolution of field-related incidents.
- Enhances communication between teams and departments.
- Provides an organized system for logging and reviewing historical site activities.
Best Practices for Managing Field Tickets
- Encourage employees to report site issues as soon as they occur.
- Assign a clear priority level to each ticket to avoid delays in resolution.
- Review and close completed tickets regularly to maintain an up-to-date activity log.
For detailed instructions, visit the Field Tickets Guide.