


Guide pour le paiement des fournisseurs et les crédits
Le Paiements des fournisseurs du système vous aide à gérer et à suivre les paiements effectués aux fournisseurs.
Ajout d'un paiement fournisseur
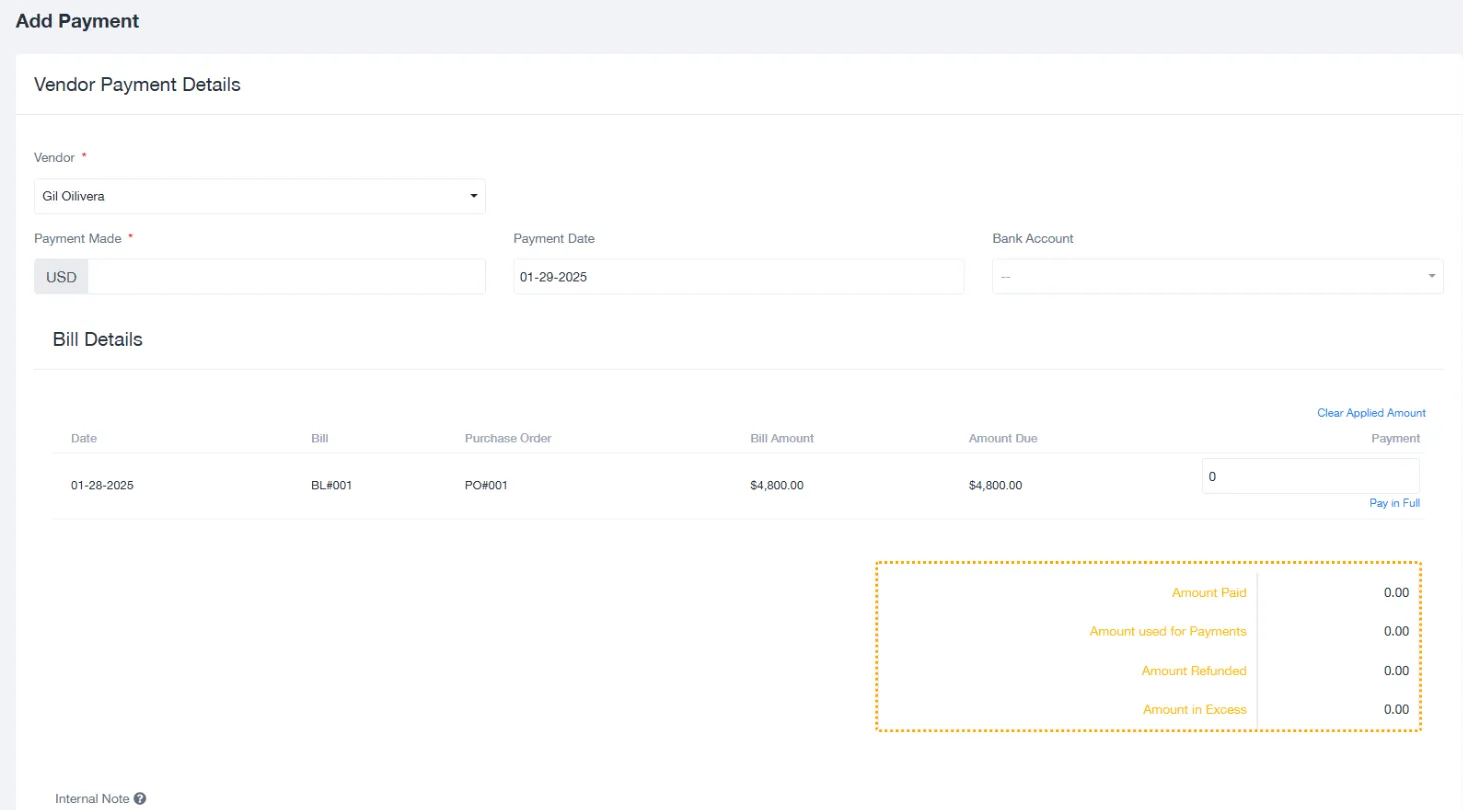
- Naviguer vers Paiements des fournisseurs:
- Pour accéder à cette section, sélectionnez l'option "Paiements des fournisseurs" dans le menu principal.
- Cliquez sur "Ajouter un paiement fournisseur".:
- Une nouvelle page s'ouvre pour saisir les détails du paiement.
- Remplir les détails du paiement:
- Vendeur: Choisissez le fournisseur que vous payez dans la liste déroulante.
- Paiement effectué: Saisissez le montant du paiement (champ monétaire disponible).
- Date de paiement: Sélectionnez la date du paiement à l'aide du sélecteur de calendrier.
- Compte bancaire: Vous pouvez sélectionner le compte bancaire utilisé pour le paiement.
- Notes internes: Ajoutez des remarques sur le paiement si nécessaire.
- Sélectionner les factures à payer:
- La section ci-dessous répertorie les factures en cours pour le fournisseur sélectionné.
- Attribuez des montants de paiement aux factures correspondantes. Vous pouvez payer en totalité ou en partie.
- En cas de trop-perçu, le système l'enregistre sous la rubrique Montant excédentaire.
- Sauvegarder le paiement:
- Cliquez sur Économiser pour finaliser le paiement. Le système met automatiquement à jour l'état de la facture.
Crédits fournisseurs
Le Crédits fournisseurs vous permet de gérer les notes de crédit émises par les fournisseurs.
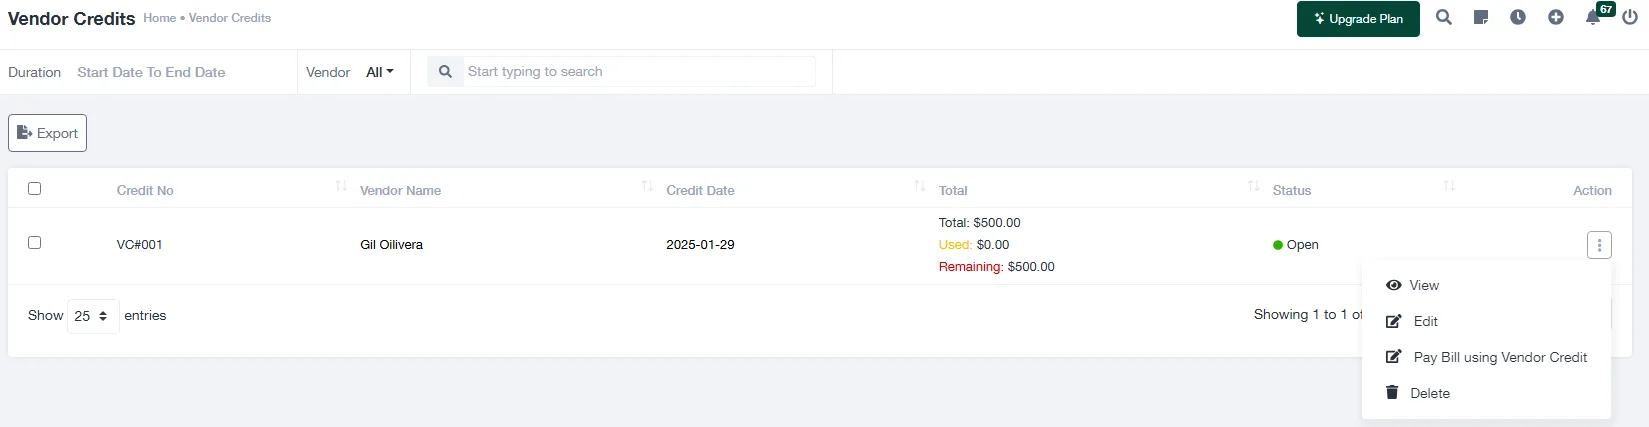
Traitement des paiements excédentaires
Lorsqu'un paiement en sus est versé à un fournisseur, le système enregistre automatiquement le trop-perçu comme un Crédit fournisseur. Ainsi, le montant excédentaire n'est pas perdu et peut être utilisé pour des transactions futures avec le même fournisseur.
Aperçu du processus
- Identification des paiements excédentaires:
- Au cours de la Paiement du fournisseur Si le paiement total dépasse le(s) montant(s) de la facture, l'excédent est classé comme un Montant excédentaire.
- Le système le marque comme un crédit dû par le fournisseur.
- Création automatique de crédits:
- Le montant excédentaire est stocké sous la rubrique Crédits fournisseurs liée au fournisseur concerné.
- Un nouveau dossier de crédit est créé, détaillant les montant du crédit, informations sur les vendeurset date de création.
- Application du crédit fournisseur:
- Les crédits fournisseurs peuvent être appliqués à de futures factures ou commandes.
- Lors du paiement d'une nouvelle facture, le système vous permettra d'utiliser les crédits existants pour réduire le montant total dû.
Principales caractéristiques des crédits fournisseurs pour les paiements excédentaires
- Transparence:
- Tous les crédits, y compris ceux générés par des paiements excédentaires, sont enregistrés avec des détails clairs tels que
- Nom du vendeur
- Facture ou bon de commande associé (le cas échéant)
- Montant et date du crédit
- Statut (par exemple, ouvert ou appliqué)
- Tous les crédits, y compris ceux générés par des paiements excédentaires, sont enregistrés avec des détails clairs tels que
- Facilité d'application:
- Lors de la création d'un nouveau paiement fournisseur, le système propose automatiquement les crédits disponibles pour le fournisseur sélectionné.
- Vous pouvez appliquer partiellement ou totalement le crédit au paiement en cours.
- Piste d'audit:
- Chaque crédit conserve l'historique de sa création et de son utilisation, ce qui garantit une piste d'audit solide pour les dossiers financiers.
Meilleures pratiques
- Rapprocher régulièrement les paiements:
S'assurer que tous les paiements des fournisseurs correspondent aux factures enregistrées afin d'éviter les divergences. - Suivi des paiements excédentaires:
Si des paiements excédentaires sont enregistrés, ils doivent être affectés à des factures ultérieures ou faire l'objet d'une demande de remboursement auprès du fournisseur. - Maintenir des notes claires:
Utilisez la section des notes internes pour suivre les détails concernant les litiges, les paiements partiels ou l'utilisation du crédit.