


Bestellungsmanagement
Eine Bestellung (PO) ist ein Geschäftsdokument, das von einem Käufer an einen Lieferanten ausgestellt wird und in dem Art, Menge und vereinbarte Preise für Produkte oder Dienstleistungen angegeben sind.
Eigenschaften
- Erstellen Sie detaillierte Bestellungen mit Produkten und Dienstleistungen.
- Verfolgen Sie den Lieferstatus und den Fortschritt der Rechnungsstellung.
- Exportieren Sie Bestellungen für die Berichterstattung und Dokumentation.
- Nahtlose Umwandlung von Bestellungen in Rechnungen.
Verwaltung von Bestellungen
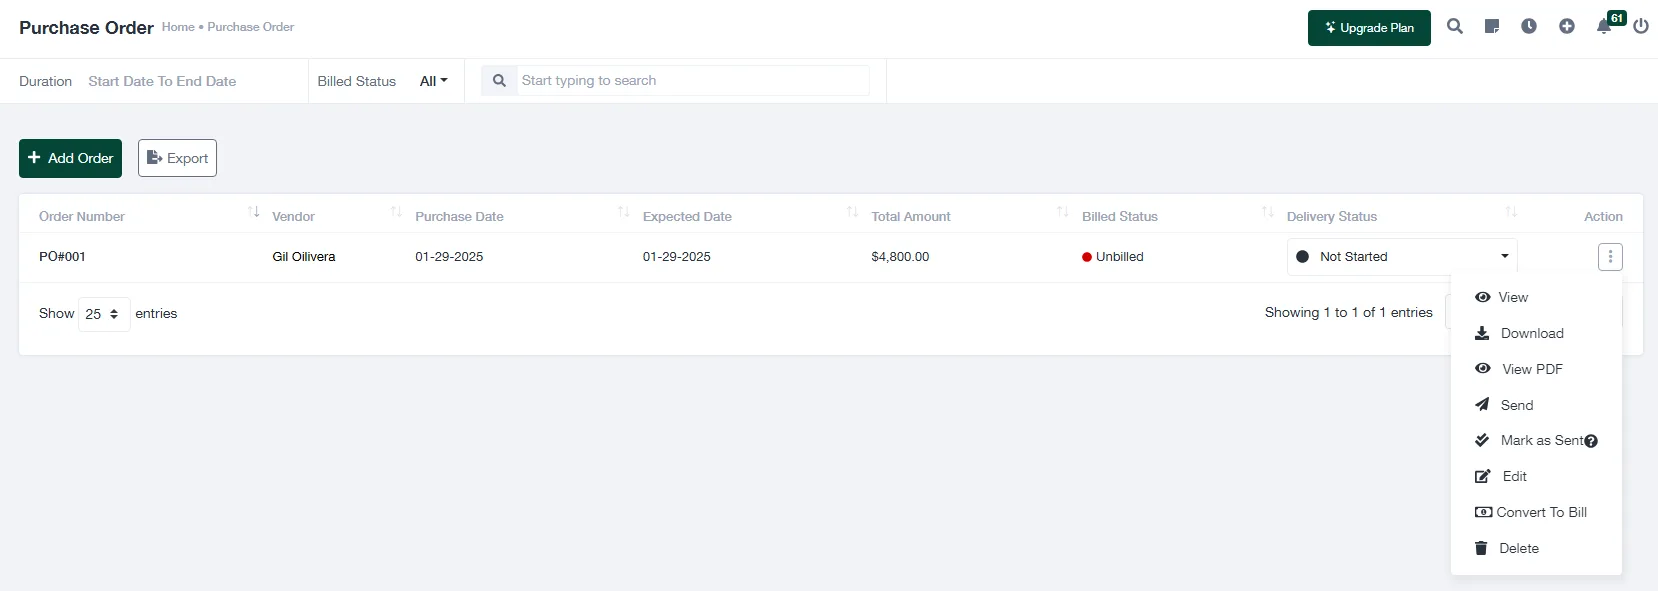
Nachdem Sie eine Bestellung erstellt haben, erscheint sie in der Bestellungsliste. Die folgenden Aktionen können durchgeführt werden:
- Ansicht: Öffnen Sie die Bestellungsdetails.
- Herunterladen: Laden Sie die Bestellung in einem Standarddateiformat herunter.
- PDF anzeigen: Generieren Sie eine PDF-Version der Bestellung.
- Senden: Senden Sie die Bestellung per E-Mail an den Lieferanten.
- Als gesendet markieren: Aktualisieren Sie den Status, um anzuzeigen, dass die Bestellung versandt wurde.
- Bearbeiten: Ändern Sie die Details der Bestellung, falls erforderlich.
- In Rechnung umwandeln: Umwandlung der Bestellung in eine Rechnung zur weiteren Bearbeitung.
- Löschen: Entfernen Sie den PO aus dem System (die Aktion ist nicht umkehrbar).
Status-Anzeigen
Die Seite Bestellungen enthält Statusanzeigen zur Überwachung des Fortschritts:
- Abgerechneter Status:
- Unbezahlt: Die Bestellung ist noch nicht in Rechnung gestellt worden.
- Abgerechnet: Die Bestellung wurde in eine Rechnung umgewandelt.
- Lieferstatus:
- Nicht gestartet: Der Lieferprozess hat noch nicht begonnen.
- In Arbeit: Die Lieferung ist im Gange.
- Abgeschlossen: Die Lieferung ist abgeschlossen.
Bestellungen exportieren
- Klicken Sie auf der Seite "Bestellungen" auf die Schaltfläche "Exportieren" Taste.
- Wählen Sie das gewünschte Format (z. B. CSV, Excel).
- Das System wird die Datei auf Ihr Gerät herunterladen.
Erstellen einer Bestellung
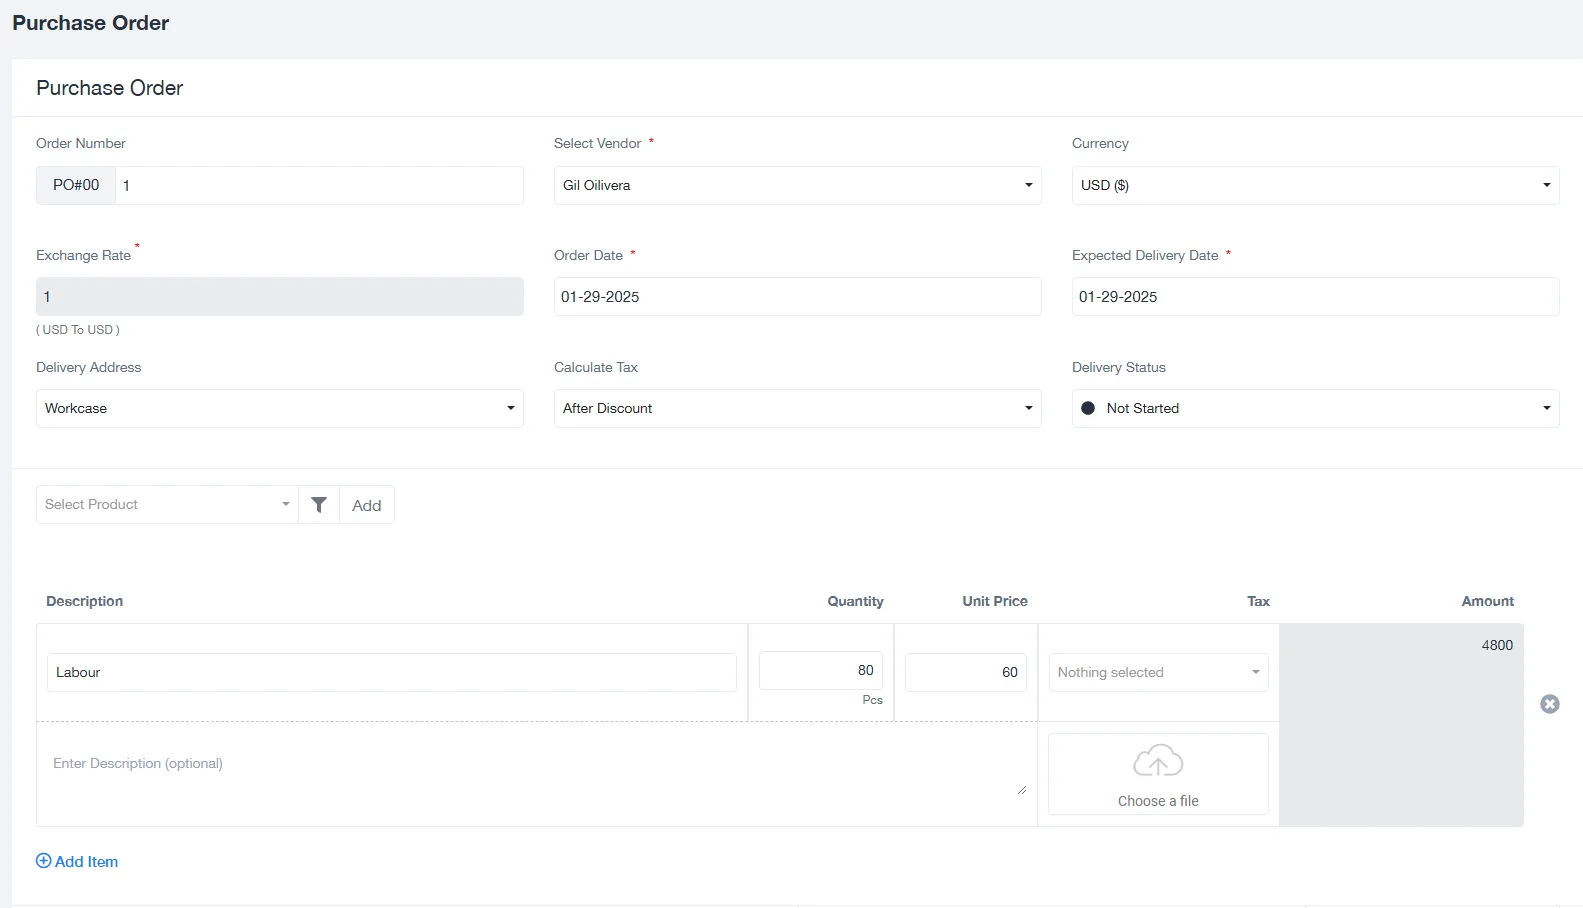
- Klicken Sie auf die "Auftrag hinzufügen" auf der Seite Bestellungen.
- Füllen Sie die folgenden Felder aus:
- Bestellnummer: Eine eindeutige Kennung für die Bestellung (z. B. PO#001).
- Anbieter auswählen: Wählen Sie einen Anbieter aus dem Dropdown-Menü.
- Währung: Wählen Sie die Währung für die Transaktion (Standard: USD).
- Datum der Bestellung: Geben Sie das Datum an, an dem die Bestellung erstellt wird.
- Voraussichtliches Lieferdatum: Geben Sie das voraussichtliche Lieferdatum für die Waren oder Dienstleistungen an.
- Lieferadresse: Wählen Sie den Ort für die Zustellung aus oder fügen Sie ihn hinzu.
- Berechnen Sie die Steuer: Wählen Sie die Steuerberechnungsmethode aus (z. B. nach Rabatt).
- Lieferstatus: Legen Sie den Status der Lieferung fest (z. B. "Nicht begonnen", "In Bearbeitung").
- Fügen Sie der Bestellung Artikel hinzu:
- Produkt: Wählen Sie aus der vorhandenen Produktliste oder fügen Sie ein neues Produkt hinzu.
- Menge: Geben Sie die Anzahl der zu kaufenden Einheiten ein.
- Preis pro Einheit: Geben Sie den Preis pro Einheit des Produkts an.
- Beschreibung: Geben Sie zusätzliche Details oder Anmerkungen an (fakultativ).
- Fügen Sie, falls erforderlich, ergänzende Dateien über das Feld "Wählen Sie eine Datei" Option.
- Klicken Sie auf "Speichern" um die Bestellung abzuschließen.
Bewährte Praktiken
- Vergewissern Sie sich, dass alle Produktangaben und Mengen korrekt sind, bevor Sie die Bestellung abschicken.
- Aktualisieren Sie regelmäßig den Status der Lieferungen, um genaue Aufzeichnungen zu führen.
- Nutzen Sie die Exportfunktion, um POs zu sichern oder sie mit anderen Beteiligten zu teilen.
Häufig gestellte Fragen
- Kann ich eine Bestellung bearbeiten, nachdem sie abgeschickt wurde?
- Ja, Sie können eine Bestellung bearbeiten, sofern sie nicht in eine Rechnung umgewandelt wurde.
- Wie kann ich dem System einen neuen Lieferanten hinzufügen?
- Navigieren Sie zum Abschnitt "Anbieter" und klicken Sie auf "Anbieter hinzufügen" um Angaben zum Lieferanten einzugeben.
- Was passiert, wenn ich eine Bestellung lösche?
- Gelöschte Bestellungen können nicht wiederhergestellt werden. Stellen Sie sicher, dass Sie bei Bedarf Sicherungskopien haben.