


Leitfaden zur Vermögensverwaltung
Dieser Leitfaden enthält Anweisungen zur Verwaltung von Projektanlagen, einschließlich des Hinzufügens neuer Anlagen, der Überprüfung bestehender Anlagen und des Exports von Anlagendaten für die Bestandsverfolgung und Berichterstattung.
1. Überblick über den Bildschirm Assets
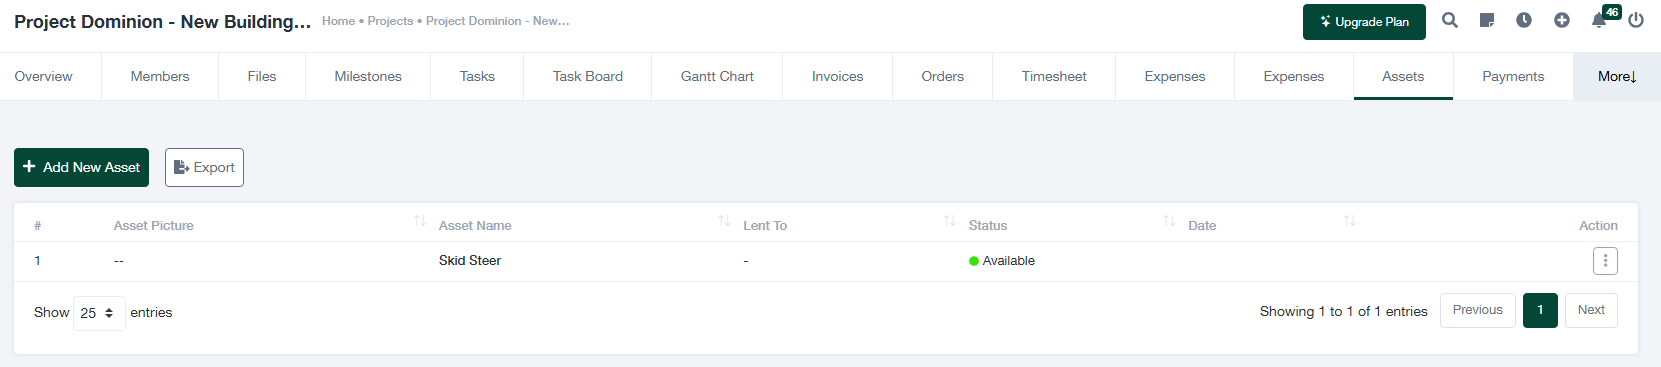
Auf der Registerkarte "Assets" innerhalb eines Projekts können Benutzer alle physischen oder digitalen Ressourcen verwalten, die mit dem Projekt verbunden sind. Im Folgenden werden die wichtigsten Funktionen des Bildschirms beschrieben:
- + Neues Asset hinzufügen: Klicken Sie auf diese Schaltfläche, um einen neuen Asset-Eintrag für das Projekt zu erstellen.
- Ausfuhr: Verwenden Sie diese Schaltfläche, um die Liste der Aktiva in einem CSV- oder Excel-Format für Aufzeichnungen oder Analysen herunterzuladen.
- Vermögenstabelle: Zeigt die folgenden wichtigen Details für jedes Asset an:
- Vermögensbild: Eine optionale visuelle Darstellung des Assets.
- Name der Anlage: Der Name des Assets (z. B. Skid Steer).
- Verliehen an: Gibt an, ob das Asset einem bestimmten Mitarbeiter oder Team zugeordnet ist.
- Status: Der aktuelle Status des Assets (z. B. verfügbar, in Wartung, beschädigt).
- Datum: Das Datum, an dem das Asset dem System hinzugefügt wurde.
2. Hinzufügen eines neuen Assets
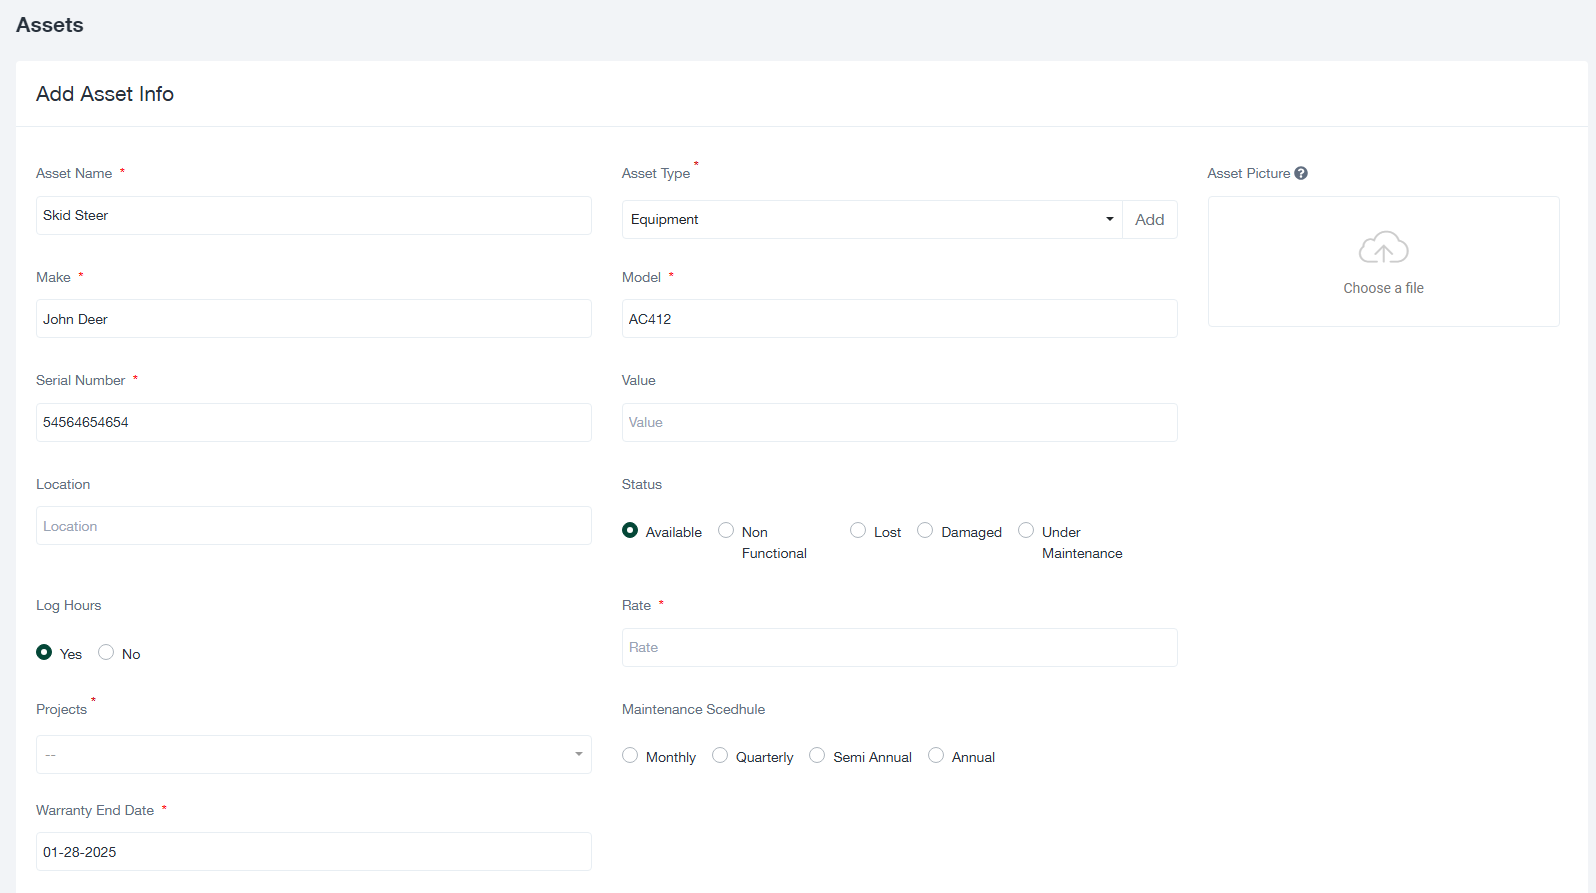
Um ein neues Asset hinzuzufügen, gehen Sie wie folgt vor:
- Klicken Sie auf die + Neue Anlage hinzufügen auf dem Bildschirm "Assets". Dadurch wird das Formular "Asset-Informationen hinzufügen" geöffnet.
- Füllen Sie die folgenden Felder des Formulars aus:
- Name der Anlage: Geben Sie den Namen der Anlage ein (z. B. Skid Steer).
- Asset-Typ: Wählen Sie die Art des Assets (z. B. Ausrüstung, Werkzeug). Klicken Sie auf "Hinzufügen", um ggf. einen neuen Typ zu erstellen.
- Marke: Geben Sie den Hersteller oder die Marke des Wirtschaftsguts an (z. B. John Deere).
- Modell: Geben Sie die Modellnummer der Anlage ein (z. B. AC412).
- Seriennummer: Geben Sie die eindeutige Seriennummer für das Asset an.
- Wert: Geben Sie den Geldwert des Vermögenswerts an.
- Standort: Geben Sie den Ort an, an dem der Vermögenswert gelagert oder verwendet wird.
- Status: Wählen Sie den aktuellen Status des Assets:
- Verfügbar: Die Anlage ist einsatzbereit.
- Nicht-funktional: Die Anlage ist nicht betriebsbereit.
- Verloren: Der Vermögenswert ist unauffindbar.
- Beschädigt: Der Vermögenswert ist kaputt oder unbrauchbar.
- Unter Wartung: Die Anlage wird gerade repariert oder gewartet.
- Log-Stunden: Geben Sie an, ob die Nutzungszeit des Assets erfasst werden soll (Ja oder Nein).
- Projekte: Weisen Sie das Asset einem bestimmten Projekt zu.
- Enddatum der Garantie: Geben Sie das Ablaufdatum der Garantie für das Wirtschaftsgut an.
- Zeitplan für die Wartung: Legen Sie die Wartungshäufigkeit fest (z. B. monatlich, vierteljährlich).
- Vermögensbild: Optional können Sie ein Bild des Assets hochladen, um es leichter identifizieren zu können.
- Klicken Sie auf Speichern Sie um den Asset-Eintrag abzuschließen oder Abbrechen um sie zu verwerfen.
3. Verwaltung bestehender Vermögenswerte
Auf dem Bildschirm "Assets" können Sie alle mit dem Projekt verbundenen Assets überprüfen und verwalten. So geht's:
- Details anzeigen: Klicken Sie auf die Schaltfläche "Aktion" neben einem Asset-Eintrag, um dessen Details anzuzeigen oder zu bearbeiten.
- Filtern und Suchen: Verwenden Sie die Suchleiste, um schnell bestimmte Assets nach Name oder Status zu finden.
- Daten exportieren: Verwenden Sie die Schaltfläche "Exportieren", um die Liste der Assets für Berichte oder Analysen herunterzuladen.
4. Tipps für eine wirksame Vermögensverwaltung
- Gewährleisten Sie Genauigkeit: Überprüfen Sie alle Asset-Details, einschließlich Seriennummern und Status, bevor Sie speichern.
- Regelmäßige Updates: Aktualisieren Sie bei Bedarf den Status von Vermögenswerten (z. B. verfügbar, beschädigt), um genaue Aufzeichnungen zu führen.
- Fotos anhängen: Laden Sie eindeutige Bilder von Vermögenswerten zur einfachen Identifizierung und Verfolgung hoch.
- Regelmäßig exportieren: Exportieren Sie regelmäßig Bestandsdaten, um Backups zu erstellen und Bestandsprüfungen zu erleichtern.
Wenn Sie weitere Hilfe benötigen, wenden Sie sich bitte an Ihren Administrator oder besuchen Sie das Help Center.