


Leitfaden für Field Ticket Management
In diesem Leitfaden werden die Funktionen, Prozesse und Best Practices für das Erstellen, Verwalten und Lösen von Außendiensttickets im System beschrieben. Außendiensttickets sind für die Nachverfolgung von Problemen, Anfragen und Lösungen unerlässlich, um die betriebliche Effizienz und Kundenzufriedenheit zu gewährleisten.
1. Überblick über das Modul Feldtickets
Das Modul "Field Tickets" dient als zentraler Knotenpunkt für die Verwaltung von Tickets im Zusammenhang mit Geräteproblemen, Serviceanfragen oder anderen betrieblichen Aufgaben. Nachfolgend finden Sie die wichtigsten Komponenten der Schnittstelle:
- Tickets insgesamt: Zeigt die kumulative Anzahl der im System protokollierten Tickets an und bietet einen schnellen Überblick über die Arbeitsbelastung.
- Geschlossene Tickets: Zeigt die Anzahl der erfolgreich gelösten und geschlossenen Tickets an.
- Tickets öffnen: Zeigt die Tickets an, an denen aktiv gearbeitet wird oder die sofortige Aufmerksamkeit erfordern.
- Ausstehende Tickets: Zeigt Tickets an, die auf zusätzliche Eingaben oder Aktionen von Teammitgliedern oder Kunden warten.
- Gelöste Tickets: Verfolgt die Anzahl der Tickets, die gelöst wurden, aber möglicherweise noch einer abschließenden Überprüfung bedürfen, bevor sie geschlossen werden.
- Filter: Verfeinern Sie die Ticketansichten anhand verschiedener Kriterien, z. B:
- Dauer: Zeigen Sie Tickets an, die innerhalb eines bestimmten Zeitrahmens erfasst wurden.
- Datum: Filtern Sie Tickets nach ihrem Erstellungs- oder letzten Aktualisierungsdatum.
- Status: Filtern Sie Tickets nach ihrem aktuellen Status, z. B. "Offen", "Geschlossen" oder "Ausstehend".
- Antragsteller: Identifizieren Sie Tickets, die von bestimmten Mitarbeitern oder Kunden erfasst wurden.
- Ticket erstellen: Eine Schaltfläche, die die Erstellung eines neuen Tickets zur Erfassung einer Anfrage oder eines Problems initiiert.
- Ticket-Formular: Ermöglicht den Zugriff auf anpassbare Vorlagen für die rationelle Erstellung von Tickets.
- Ausfuhr: Ermöglicht den Export von Ticketdaten in Berichte für Analysen, Aufzeichnungen oder Kundenpräsentationen.
- Ticket-Tisch: Zeigt eine detaillierte Liste der Tickets mit den folgenden Spalten an:
- Fahrschein #: Eine eindeutige Kennung für jedes Ticket.
- Ticket Betreff: Eine kurze Beschreibung des Problems oder der Anfrage.
- Name des Antragstellers: Die Person oder Einrichtung, die das Ticket erstellt hat.
- Angefordert am: Das Datum und die Uhrzeit, zu der das Ticket eingereicht wurde.
- Status: Zeigt den Fortschritt des Tickets an, z. B. "Offen", "Geschlossen" oder "Gelöst".
- Vorrangig: Hebt die Dringlichkeitsstufe (z. B. Niedrig, Mittel, Hoch) hervor, um eine effektive Priorisierung der Aufgaben zu ermöglichen.
2. Wie man ein neues Ticket erstellt
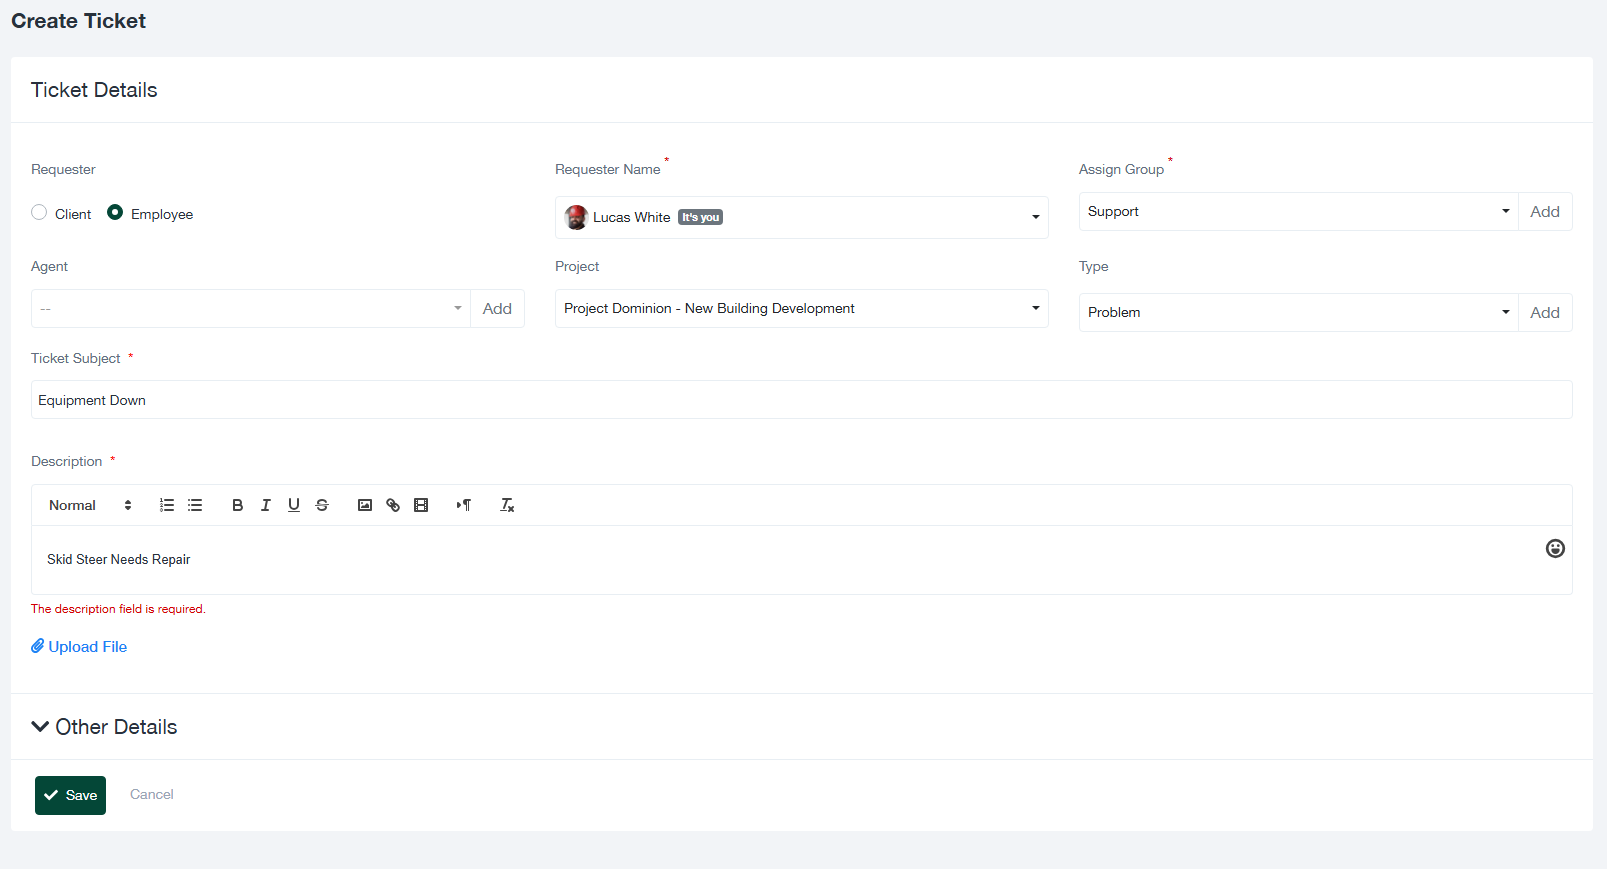
Die Erstellung eines Tickets ist der erste Schritt bei der Bearbeitung eines Problems oder einer Anfrage. Führen Sie die folgenden Schritte aus, um ein neues Ticket zu erstellen:
- Navigieren Sie zum Modul "Tickets" und klicken Sie auf die Schaltfläche Ticket erstellen Taste.
- Füllen Sie das Formular "Ticket Details" mit den folgenden Informationen aus:
- Antragsteller: Wählen Sie aus, ob das Ticket von einem Kunde oder ein Mitarbeiter.
- Name des Antragstellers: Wählen Sie die Person, die das Ticket protokolliert, aus dem Dropdown-Menü aus.
- Gruppe zuweisen: Geben Sie die Gruppe an, die für die Bearbeitung des Tickets zuständig ist (z. B. Support, Betrieb).
- Vertreter: Weisen Sie optional einen Bearbeiter zu, der das Ticket betreut.
- Projekt: Verknüpfen Sie das Ticket mit einem relevanten Projekt, um einen Zusammenhang herzustellen.
- Art: Wählen Sie die Kategorie des Tickets (z. B. Problem, Aufgabe, Anfrage).
- Ticket Betreff: Geben Sie einen prägnanten und beschreibenden Titel für die Ausgabe ein.
- Beschreibung: Geben Sie eine ausführliche Erklärung des Problems, einschließlich aller relevanten Hintergrundinformationen oder Schritte, um das Problem zu reproduzieren.
- Anhänge: Laden Sie unterstützende Dateien hoch, z. B. Bilder, Dokumente oder Protokolle, um zusätzlichen Kontext zu liefern.
- Klicken Sie auf Speichern Sie um das Ticket zu protokollieren oder Abbrechen um die Änderungen zu verwerfen.
3. Vorhandene Tickets verwalten
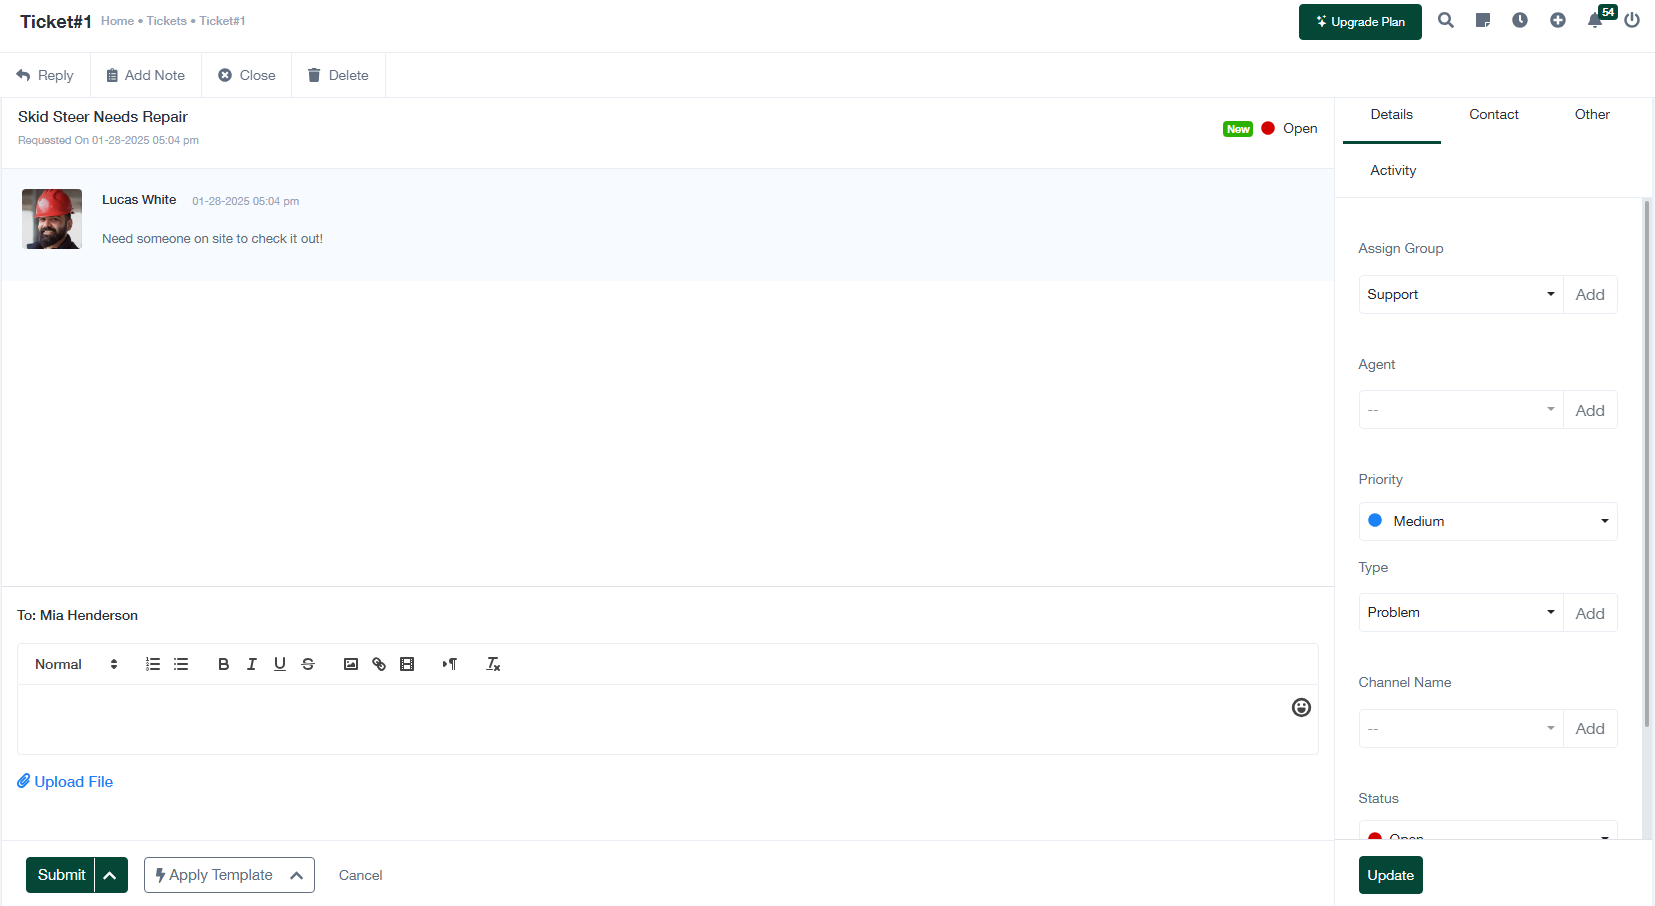
Sobald Tickets protokolliert sind, können sie mit den folgenden Aktionen verwaltet und aktualisiert werden:
- Ticket-Details anzeigen: Klicken Sie auf ein Ticket, um dessen Detailansicht zu öffnen. Dieser Bildschirm zeigt den Verlauf, den aktuellen Status und die zugehörigen Notizen des Tickets.
- Ticket aktualisieren: Ändern Sie Ticketattribute, wie Priorität, zugewiesene Gruppe oder Bearbeiter. Sie können auch Kommentare hinzufügen oder zusätzliche Dateien hochladen.
- Antwort auf Tickets: Verwenden Sie die Antwortfunktion, um mit dem Antragsteller oder Teammitgliedern über den Fortschritt des Tickets zu kommunizieren.
- Tickets schließen: Markieren Sie Tickets als gelöst, sobald das Problem behoben wurde. Fügen Sie eine abschließende Notiz hinzu, in der Sie die Lösung zusammenfassen.
- Tickets löschen: Entfernen Sie Tickets, die nicht mehr relevant sind oder irrtümlich erstellt wurden.
- Aktivität verfolgen: Überprüfen Sie das Aktivitätsprotokoll, um Aktualisierungen, Antworten und Änderungen an der Anfrage zu überwachen.
4. Bewährte Praktiken für die Ticketverwaltung
Um eine effiziente Bearbeitung und Lösung von Anfragen zu gewährleisten, halten Sie sich an die folgenden bewährten Verfahren:
- Stellen Sie detaillierte Informationen bereit: Geben Sie bei der Erstellung eines Tickets alle notwendigen Details an, um die Kommunikation zu minimieren.
- Ordnen Sie richtige Prioritäten zu: Legen Sie die Dringlichkeit jedes Tickets klar fest, um sicherzustellen, dass kritische Probleme umgehend bearbeitet werden.
- Fortschritte überwachen: Überprüfen Sie regelmäßig den Status offener Anfragen und ergreifen Sie die notwendigen Maßnahmen, um diese zu lösen.
- Schablonen verwenden: Nutzen Sie vordefinierte Vorlagen für sich wiederholende Ticketarten, um Zeit zu sparen und Konsistenz zu gewährleisten.
- Effektiv kommunizieren: Verwenden Sie die Antwortfunktion, um die Beteiligten über den Fortschritt des Tickets und die nächsten Schritte zu informieren.
- Schließen Sie Tickets umgehend: Markieren Sie Tickets erst dann als geschlossen, wenn das Problem vollständig gelöst ist, und fügen Sie eine Zusammenfassung für zukünftige Referenzen hinzu.
5. FAQs
F: Was soll ich tun, wenn ich ein Ticket nicht einer Gruppe zuweisen kann?
A: Vergewissern Sie sich, dass die Gruppe im System konfiguriert ist und über die erforderlichen Berechtigungen zur Bearbeitung von Tickets verfügt.
F: Kann ich ein Ticket einem anderen Mitarbeiter zuweisen?
A: Ja, Sie können das Feld für den Bearbeiter im Bildschirm mit den Ticketdetails aktualisieren, um das Ticket einer anderen Person zuzuweisen.